
If your primary goal is to track lead source within the Pardot ecosystem, using landing pages instead of a separate website, then check out the documentation here.
For everyone else, let’s dig in.
Many Pardot users are setting up Pardot to integrate with an existing digital marketing ecosystem, which includes a website that features free and gated content, event registration, demo request and contact forms, etc. A business that finds the automated functionality of Pardot and Salesforce beneficial clearly has a sales funnel, and would certainly benefit from tracking leads through from first touch to closing.
Unfortunately, Pardot’s out-of-the-box lead source tracking is really limited to assets within the Pardot ecosystem. A form on a Pardot landing page will capture lead source without any extra set up on your end, but a form embedded in your WordPress website will not be able to capture that tracking information.
In this post I’ll show you how to set up lead tracking so you can keep users on your site and still send that data to Pardot and Salesforce.
Table of Contents
Pardot Tracking Code Doesn’t Work with External Forms
Pardot will only automatically populate Lead Source and Google Analytics tracking fields on Pardot-native marketing assets, e.g. Landing Pages. If you are using an external form on your website, for example Gravity Forms and WordPress, you’ll need to create a custom solution to capture these fields on your own.
The first thing you’ll want to do is set up your external forms to communicate with Pardot using Form Handlers. Check out this post to learn more about how to use Form Handlers.
Once you have your form handlers set up, you can focus on
- How to capture lead source data
- How to pass that data through from your external site to Pardot
In the example that I give here I’m using Gravity Forms and WordPress, which I believe is a pretty common set up. If you’re using a different CMS or a different form tool, the scripts and concepts here should still be relevant. If you would like help figuring out how to make this approach work with your current set up feel free to reach out, I’m happy to help.
At a high level this looks like:
Capture url parameters as cookie values
Pardot captures Google Analytics data using URL parameters that you should be familiar with: utm_medium, utm_campaign, utm_source, etc. Read more about these URL parameters and how they work for Google Analytics here.
When you set up an ad campaign you can use these URL parameters to track engagement in Google Analytics. We can recapture these parameters as cookies to pass to Pardot so we can use that information to better track conversions and marketing ROI for ad campaigns, etc.
The script used in this example to capture URL parameters as cookies will save the cookie values for 2 years, to make sure that the first touch doesn’t change for the duration of the sales cycle (which in this case is pretty long). The cookie values will not be overwritten until the cookie expires and is deleted. Then it will be re-written the next time the user visits after the cookie expires.
Dynamically populate form fields with cookie values
Gravity Forms allows us to dynamically populate form fields using the names of the URL parameters that we’ll save for each visitor.
With the lead source tracking fields dynamically populated, they will be passed like any other form field via the form handler.
Step by step: Setting up Gravity Forms + Pardot for Lead Source Tracking
Step 1: Create custom fields in Pardot
The Lead Source and Google Analytics fields in Pardot are not accessible for Pardot users. Because these fields can only be dynamically populated, you will need to create your own prospect Custom Fields for each data point you want to report one.
Some examples include:
- utm_medium
- utm_campaign
- utm_source
- gclid
Step 2: Capture URL Parameters as Cookies
Pardot tracking cookies are encrypted and therefore we are not able to use them for our custom solution. Instead we can write our own simple tracking scripts to save URL parameters as cookies.
Here is the script that you can use to capture URL parameters. You can publish this script before the closing </body> tag on every page of your website, or publish it as a tag via Google Tag Manager. Make sure the script is set to fire on every page.
<script>

// Get and parse the URL parameters into discreet names with associated values
function getQueryVariable(variable)
{
       var query = window.location.search.substring(1);
       var vars = query.split("&");


       for (var i=0;i<vars.length;i++) {
               var pair = vars[i].split("=");
               if(pair[0] == variable){return pair[1];}
       }
        return('');
}


// Check that cookie is empty

function getCookie(cname) {
  var name = cname + "=";
  var ca = document.cookie.split(';');
  for(var i = 0; i < ca.length; i++) {
    var c = ca[i];
    while (c.charAt(0) == ' ') {
      c = c.substring(1);
    }
    if (c.indexOf(name) === 0) {
      return c.substring(name.length, c.length);
    }
  }
  return "";
}


 var expirationTime = 63120000; // Change expiration time here. Set to 24 months in seconds
 expirationTime = expirationTime * 1000; // Converts expiration time to milliseconds
 var date = new Date();
 var dateTimeNow = date.getTime();

 date.setTime(dateTimeNow + expirationTime); // Sets expiration time (Time now + 24 months)
 var date = date.toUTCString(); // Converts milliseconds to UTC time string


 // Add url parameter names you want to track here
var all_params_to_track = [
  'utm_source',
  'utm_medium',
  'utm_campaign',
  'gclid'
];

// If cookie is empty, write url parameter as cookie value
all_params_to_track.forEach(function(param) {
  var pValue = getQueryVariable(param);
  var a = getCookie(param);
  if (a === null || a === '') {
    var cookie = document.cookie = param +"="+ pValue +"; SameSite=None; Secure; expires="+date+"; path=/; domain=." + location.hostname.replace(/^www\./i, ""); // Sets cookie for all subdomains
  }

    else {}
});

</script>
What does this script do?
- It parses the URL parameters into they key value pairs, that look like this: key=value, where key is the parameter name and value is the parameter value.
- It checks the URL parameters to see if any match the parameters defined for tracking. If so, it then it checks if the cookie with the same name is empty. If the cookie doesn’t exist, or if the cookie value is empty, then it saves the key value pair as the name and value of that cookie. These cookies are set to expire in 24 months.
- See the comments in the code to learn which pieces of the script you can edit to suit your needs.
Step 3: Allow Gravity Forms to recognize our new custom parameters
Add the following code to functions.php. Make sure to edit the names of the registered parameters to match the names of the cookies you save in the previous step.
// Gravity Forms required.
// Make sure 'Allow Dynamic Population' is selected on the relevant form fields.
// Use parameter names that match the names of the cookies in the filters below.
// Paste the filters below into your theme's functions.php


add_filter( 'gform_field_value_gclid', 'populate_gclid' );
function populate_gclid( $value ) {
   return $_COOKIE['gclid'];
}

add_filter( 'gform_field_value_utm_campaign', 'populate_utm_campaign' );
function populate_utm_campaign( $value ) {
   return $_COOKIE['utm_campaign'];
}

add_filter( 'gform_field_value_utm_medium', 'populate_utm_medium' );
function populate_utm_medium( $value ) {
   return $_COOKIE['utm_medium'];
}

add_filter( 'gform_field_value_utm_source', 'populate_utm_source' );
function populate_utm_source( $value ) {
   return $_COOKIE['utm_source'];
}
Step 4: Set up the Pardot Form Handler
See this blog post to learn how to set up the Pardot form handler.
Step 5: Create the form in Gravity Forms
After creating the form and mapping the form fields to integrate the Pardot form handler, double back to the Lead Source tracking fields.
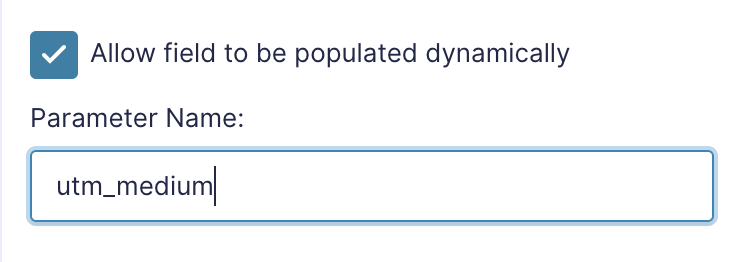
Go to the lead source tracking field, and navigate to Field Settings > Advanced. Click ‘Enable Dynamic Population’ and type in the name of the appropriate URL parameter/cookie name.
Now you have everything set up, make sure to test your new form. You can do this by adding a test url parameter value for the parameter you’ve defined in the tracking script. Try adding the test parameter to the link to your site’s home page and then navigate away to the page where you have your form.
You’ll see the url parameters don’t carry over to the pages you visit as you navigate through the site, but after you submit the form, you should see that your prospect’s custom field in Pardot is now populated with the test value you added to the end of your home page link.